Quickstart
To introduce qalx we are going to follow a very simple example of an engineering calculation.
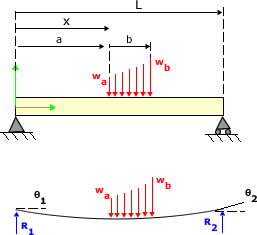
We’ll use an example of a beam in bending to demonstrate the power of qalx. We’ll start by introducing all the key concepts of the platform then we’ll expand on this to show some advanced features.
Let’s suppose that we are interested in calculating the stress in flat plates of various shapes.
Note
This guide assumes you’ve followed the instructions on installing and authentication
QalxSession
Every interaction that you will have with qalx will be attached to a
QalxSession. This enables you to create an interface once and then reuse it
with the same session details to create multiple entities consistently.
from pyqalx import QalxSession

qalx = QalxSession()

item1 = qalx.item.add(data={'thickness': 5, 'length': 15}, meta={'_class':'thing.dimensions'})
item2 = qalx.item.add(data={'thickness': 5, 'length': 18}, meta={'_class':'thing.dimensions'})
item3 = qalx.item.add(data={'thickness': 5, 'length': 19}, meta={'_class':'thing.dimensions'})

set1 = qalx.set.add(
    items={'item1': item1, 'item2': item2, 'item3': item3},
    meta={'_class':'thing.things'}
)
Metadata
All entities can have metadata attached to them through the meta field. This should be used to store information about the entity that describes the entity but is not critical to its use.
For classifying entities for easy retrieval later we recommend using a meta._class key and setting the value to be a category hierarchy separated by ., for example we use an example below of calculating stress in beams. We therefore add beams.shape to the items that define shapes and beams.length to the items that define length. Because we could use the steel material in other calculations we add material.property.density to the item defining that property.
For more details on searching and sorting entities, see Searching and Sorting.
By using the meta._class field it should allow us to create a database index on this key to ensure searching for items by key is as quick as possible.
Item
The most basic feature of qalx is that it stores data items. These can be either a file or structured data. They can optionally have some metadata associated with them.
Going back to our beam stress example. Suppose that we are working from
a trivial table of beam specifications beam-spec-123:
CODE |
Thickness (m) |
Breadth (m) |
|---|---|---|
10 X 3MM |
3e-3 |
10e-3 |
13 X 3MM |
3e-3 |
13e-3 |
20 X 6MM |
6e-3 |
20e-3 |
30 X 5MM |
5e-3 |
30e-3 |
30 X 12MM |
12e-3 |
30e-3 |
50 X 6MM |
6e-3 |
50e-3 |
We can create each of these as an item in the platform
from pyqalx import QalxSession

qalx = QalxSession()

specs = [
     {"CODE": "10 X 3MM", "thickness": 3e-3, "breadth": 10e-3},
     {"CODE": "13 X 3MM", "thickness": 3e-3, "breadth": 13e-3},
     {"CODE": "20 X 6MM", "thickness": 6e-3, "breadth": 20e-3},
     {"CODE": "30 X 5MM", "thickness": 5e-3, "breadth": 30e-3},
     {"CODE": "30 X 12MM", "thickness": 12e-3, "breadth": 30e-3},
     {"CODE": "50 X 6MM", "thickness": 6e-3, "breadth": 50e-3},
    ]

beam_items = {}
for shape in specs:
    item = qalx.item.add(data=shape,
                    meta={"_class":"beams.shape", "shape_source": "beam-spec-123"})
    beam_items[shape['CODE']] = item
If we had a copy of the pdf of the table, we could save it with
file_item = qalx.item.add(input_file="/path/to/file/beam-spec-123.pdf",
                          meta={"source":
                                  {"email": "RE: What spec are we using?"},
                                "_class": "beams.specs"
                               }
                          )
We could even supply a file stream along with a file name
file_item = qalx.item.add(input_file=open("/path/to/file/beam-spec-123.pdf", rb),
                          file_name='beam-spec-123.pdf',
                          meta={"source":
                                  {"email": "RE: What spec are we using?"},
                                "_class": "beams.specs"
                               }
                          )
Blueprints
Blueprints enable you to repeat the creation of Items or Sets in a consistent fashion.
Create a blueprint using the Blueprint class and helper methods to add schema elements. Blueprint names are unique across an entire company.
To create a blueprint for an item you can add various rules for data keys and then use the blueprint by name to validate any future items you add to qalx.
from pyqalx import QalxSession, Blueprint
from tests.conftest import append_short_uuid

qalx = QalxSession()

dim_schema = Blueprint.item()
dim_schema.add_data("width", {"type": "number"}, required=True)
dim_schema.add_data("height", {"type": "number"}, required=True)
dims_name = append_short_uuid("DimsBlueprint")
dim_bp = qalx.blueprint.add(name=dims_name, schema=dim_schema)

mat_schema = Blueprint.item()
mat_schema.add_data("density", {"type": "number"}, required=True)
mat_schema.add_data("E", {"type": "integer", "multipleOf": 1e9}, required=True)
mats_name = append_short_uuid("MatsBlueprint")
mat_bp = qalx.blueprint.add(name=mats_name, schema=mat_schema)

set_schema = Blueprint.set()
set_schema.add_item("dimensions", dim_bp)
set_schema.add_item("material", mat_bp)
sets_name = append_short_uuid("ASetBlueprint")
set_bp = qalx.blueprint.add(name=sets_name, schema=set_schema, meta={"_class":"beams"})

d = qalx.item.add(data={"height": 30, "width": 5}, blueprint_name=dims_name, meta={"_class":"beams.shape"})
m = qalx.item.add(data={"density": 1.4, "E": 120e9}, blueprint_name=mats_name, meta={"_class":"materials.properties"})
s = qalx.set.add(
    items={"dimensions": d, "material": m}, blueprint_name=sets_name, meta={"_class":"beams.spec"}
Set
We can combine data items together in sets to allow us to work on them later.
Suppose we want to look at a range of beam specs and distributed loads for various lengths of beam. We will also have a constant material across all the beams we calculate.
To do this for each scenario we create the inputs as an item and then combine them as sets of data.
import itertools

from pyqalx import QalxSession

qalx = QalxSession()

specs = [
    {"CODE": "10 X 3MM", "thickness": 3e-3, "breadth": 10e-3},
    {"CODE": "13 X 3MM", "thickness": 3e-3, "breadth": 13e-3},
    {"CODE": "20 X 6MM", "thickness": 6e-3, "breadth": 20e-3},
    {"CODE": "30 X 5MM", "thickness": 5e-3, "breadth": 30e-3},
    {"CODE": "30 X 12MM", "thickness": 12e-3, "breadth": 30e-3},
    {"CODE": "50 X 6MM", "thickness": 6e-3, "breadth": 50e-3},
]

uniform_loads = range(2, 11, 2)
lengths = range(8, 9, 1)
density = qalx.item.add(
    data={"value": 7850, "units": "kg/m^3"},
    meta={"material": "steel", "_class":"materials.property.density"}
    )

sets = {}
for s, l, udl in itertools.product(specs, lengths, uniform_loads):
    shape = qalx.item.add(data=s, meta={"_class":"beams.shape", "shape_source": "beam-spec-123"})
    length = qalx.item.add(data={"value": l, "units": "m"}, meta={"_class":"beams.length"})
    load = qalx.item.add(data={"value": udl, "units": "kg/m"}, meta={"_class":"beams.load"})
    set_name = f"{s['CODE']} @ {l} under {udl}"

    sets[set_name] = qalx.set.add(items={
        "shape": shape,
        "density": density,
        "load": load,
        "length": length
    }, meta={"name": set_name, meta={"_class":"beams.beam"}})
As you can see we can structure our data to ensure we are managing the correct input units and can add various metadata to the items to allow us to search for them easily later.
Note
Sets can be given a blueprint as well
Group
Prior to working on your sets of data it is often useful to group them together so that you can easily retrieve them all later. You can also add some metadata to the group to add some context.
Following on from the code above:
group = qalx.group.add(sets=sets, meta={"batch": "Flat bar of mild steel", "_class":"beams.batch"})
Queue
Now that we’ve compiled our input data and attached some metadata we’ll need somewhere to store the information ready to be processed. We do this by creating a queue. We can then add sets, items or groups to the queue to be processed later.
queue = qalx.queue.get_or_create(name="beam calcs")
Group.add_to_queue(payload=group, queue=queue, children=True)
Bot
So we now have some data sets in a queue. We want to work on them to perform some calculations and save the calculated data.
In qalx we use the concept of a bot. A bot is essentially a chunk of code that takes an item, set, or group as the input and uses the data to perform a task.
Note
for bots to work they need to authenticate with an API token. This
will be generated automatically when the bot is started using the
TOKEN of the user that starts the bot. The bot will have exactly the same permissions as the user.
The code for the bot itself can do anything from very simple calculations (as you will see from our beam example) up to complex processes with calls to multiple external services.
A bot can run anywhere you can run qalx and any other dependencies you may have.
Let’s build our first simple bot to calculate the bending stress in the root of our beams.
We’ll save our bot in a file called stress_bot.py this is important as it allows us to start it later from the
Command Line Interface.
from uuid import uuid4

from pyqalx import Bot

bot = Bot("Beam stress calculator " + uuid4().hex[-6:])  # bot names must be unique


# this decorator tells the bot what function to call to process the set
@bot.process
def beam_calcs(job):
    shape_data = job.entity.get_item_data("shape")  # get the shape item data from the set
    density_data = job.entity.get_item_data("density")  # get the density item data from the set
    load_data = job.entity.get_item_data("load")  # get the load item data from the set
    length_data = job.entity.get_item_data("length")  # get the length item data from the set

    # define a stress calculation function
    def stress_of_beam_in_bending(length, breadth, thickness, density, udl):
        """ calculates bending stress in a simply supported beam
        """
        load = 9.81 * (udl + density * breadth * thickness)
        max_moment = (load * length ** 2) / 8
        I = (breadth * thickness ** 3) / 12
        y = thickness / 2
        return max_moment / (I / y)

    max_stress = stress_of_beam_in_bending(
        length_data['value'],
        shape_data['breadth'],
        shape_data['thickness'],
        density_data['value'],
        load_data['value'],
    )

    print(job.entity.meta.set_name, max_stress)
    job.add_item_data("stress", data={
        "value": max_stress,
        "units": "MPa"
    }, meta={"_class":"beams.stress"})
We can then call:
$ qalx bot-start --processes 4 --queue-name "beam calcs" stress_bot:bot
This will start the bot in four processes and will calculate the stress for all our flat bar specs. It will save the results back to qalx in the same set that was sent to the queue. By default, the bot continues to run forever looking periodically at the queue to see if there are any new beam calculations to do.
Of course, this beam calculation problem is a very simple introduction to the core concepts of qalx. For more details about building bots see Bots.
Fields
All of the above methods also accept an optional fields argument. This argument accepts a list of fieldnames for any method where you interface with the API (get, find, find_one, add, save etc).
Providing this argument will cause the API to only return the fields specified. By default all fields are returned.
Note
The guid will always be returned from the API, regardless of what fields are specified
>>> from pyqalx import QalxSession

>>> qalx = QalxSession()

>>> item = qalx.item.add(data={"CODE": "10 X 3MM", "thickness": 3e-3, "breadth": 10e-3},
>>>                      meta={'author': 'Joe Bloggs'},
>>>                      fields=['meta', ])

>>> item
>>> {'guid': UUID('06757b61-ddc8-4a9a-9612-0f49cef86e92'),
>>>  'meta': {'author': 'Joe Bloggs'}}

>>> item = qalx.item.get(guid=item['guid'], fields=['guid'])

>>> item
>>> {'guid': UUID('06757b61-ddc8-4a9a-9612-0f49cef86e92')}
You can also use dot notation to only return a subset of data
>>> from pyqalx import QalxSession

>>> qalx = QalxSession()
>>> # Make a Set with a couple of items
>>> item1 = qalx.item.add(data={'height': 20})
>>> item2 = qalx.item.add(data={'height': 30})
>>> itemset = qalx.set.add(items={'item1': item2, 'item2': item2})

# Now return just a single item on the set
>>> itemset = qalx.set.get(itemset['guid'], fields=['items.item1'])
# Only 'item1' has been returned.
{'guid': UUID('064fd357-3d8d-4ff6-b0f5-cad1e509eca1'),
 'items': {'item1': <item1-data>}}
You can even return a subset of fields for a child entity using dot notation
>>> from pyqalx import QalxSession

>>> qalx = QalxSession()
>>> # Make a Set with a couple of items
>>> item1 = qalx.item.add(data={'height': 20, 'width': 20})
>>> item2 = qalx.item.add(data={'height': 30, 'width': 50})
>>> itemset = qalx.set.add(items={'item1': item2, 'item2': item2})

# Now return just a single item on the set and only one data key on the item
>>> itemset = qalx.set.get(itemset['guid'], fields=['items.item1'], child_fields=['data.height'])
{'guid': UUID('29fe7aba-f48e-4582-ad51-b298c8d4a2da'),
'items': {'item1': {'guid': UUID('ca645516-acc7-4295-9f8d-8c9231cd8ba1'),
                    'data': {'height': 30}}}}